Getting started with networking can feel a little abstract when most of the learning is happening through videos, diagrams, and certification material. That is exactly why I wanted to begin building a simple home lab with real hardware. For this first session, I used a TP-Link TL-SG108E smart switch as the foundation of a small practice setup. The goal was not to jump straight into advanced features. It was to get the switch connected properly, confirm that it was working on my network, log into the management interface, and start understanding what a managed switch actually looks like in a real environment.
The physical setup was simple but important. I connected the switch to my main router and then connected my desktop computer to the switch as well. Once both connections were in place, the port lights came on and my computer stayed online, which confirmed that the switch was passing traffic normally. From there, I installed TP-Link’s management utility and let it scan the network for discoverable devices. The switch appeared in the software, which was a nice small win because it meant the lab was already more than just “plugged in.” It was visible, manageable, and ready to explore.
After logging in, I changed the default password right away and started reviewing the basic system information. I confirmed the switch model, hardware version, management IP address, and other identifying details. I also checked the port monitoring area, where I could see that the active ports were linked at 1000M Full, meaning both the router connection and the desktop connection were running at gigabit speed in full duplex. That alone made several networking concepts feel more real. Instead of just reading terms like uplink, link status, full duplex, transmitted packets, and received packets, I was seeing them live on my own network.
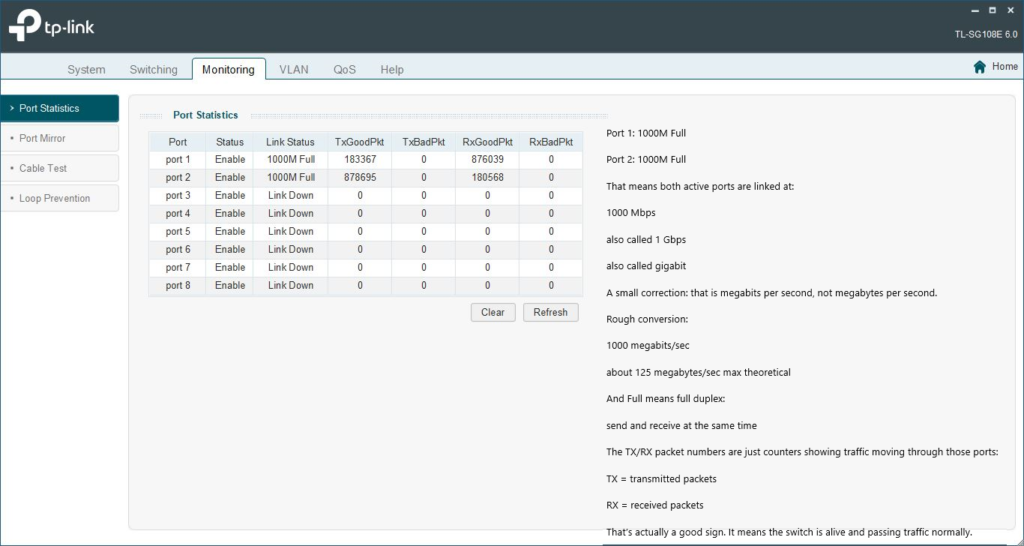
One small but useful detail was seeing packet counters actively increase on the connected ports. Even though this was a very basic first lab, it helped connect the theory to something visual and measurable. I could see that the switch was not only powered on, but actually doing work. I also checked the IP settings and confirmed that the switch had received its management address through DHCP, which is fine for this stage of learning. Rather than changing too many settings too quickly, I wanted this first lab to focus on orientation, observation, and documentation.
Before wrapping up, I created a backup of the switch configuration and saved it to a lab folder on my desktop. That may sound small, but it is part of building good habits early. If I start experimenting later with VLANs, monitoring features, or other configuration changes, I will already have a known-good restore point to fall back on. That is the kind of simple discipline that makes a home lab more useful over time.
Overall, this first networking lab was less about doing something flashy and more about building a proper base. I now have a working managed switch connected to my network, access to its management tools, a clearer understanding of what the dashboard shows, and a setup that is ready for future labs. That makes the next steps much easier. From here, I can start exploring things like VLANs, segmentation, port-based behavior, and troubleshooting with a much better foundation than I had before.
If you’re getting started with networking yourself, this kind of first lab is worth doing. You do not need enterprise gear or a complicated rack setup to begin learning real concepts. A small smart switch, a couple of Ethernet cables, and some patience are enough to start turning textbook knowledge into something practical.